Showing posts with label Dyes. Show all posts

Tuesday, January 18, 2011

New From Kandi Corp! DeColourant and DeColourant Plus : Color Remover and Color Replacer For Cloth and Paper

Those of you who have been reading my blog for some time know what an inveterate gadget girl I am - and you also know how much I love trying new products. I was very fortunate to have been given an opportunity to try two new products from KandiCorp called DeColourant and DeColourant Plus. These formulas are for use in both removing, and removing and replacing, colors on natural fabrics and papers - an alternative to using bleach.
DeColourant  is available in(from left to right:
  • Mist- great to use for creating cloud effects
  • Paste- I found this to be the best for use with  stencils and stamps
  • DeColourant Plus ( 2 bottles)- this product both removes and replaces color and it is available in a plethora of great colors. My packet contained lemon yellow and neon orange (the person who chose the colors must have bee psychic eh?!)
These are the product highlights from the promotional flyers:
  • Ready To Use- Non Messy Formula
  • More Color Removed From Natural Fabrics
  • Precision Fine Line Detail
  • Will Not Stiffen Fabric
  • Will Not Weaken Fabric
  • Pleasant Citrus Scent
  • Safe For Children

I decided that I would try the products on a Moda marble in black, a linen in green and a dark green paper. Next I chose a stencil (I ultimately used only the sunflower) and a few foam stamps.
The paste product is a very creamy texture and worked, IMHO, the best for both stencils and stamps. It did, indeed, provide good line detail. I tried the mist with the stencil and ended up with a blob - but it worked well as an overall spray to simulate clouds.The product  is applied and then allowed it to dry. thoroughly. Next step: you iron - and that's how you remove the color. The simple directions say that using steam removes even more color - and it did.

Below you can see the fabrics and paper right after I finished ironing the color out. Before washing the hand of the fabric is a bit stiff - rather t=like dried soda soaked fabric. Once washed, however, the hand is as soft as ever. That's a very good quality of this product. Additionally, this product also can be activated by the sun - so you can use it to sun print  paper, fabric, tee shirts and more.

Below: 
You can easily see that the best effect was achieved when I used the paste with a stencil (left). The paste used on a foam stamp was less precise, but wasn't bad either. On the bottom left was the mist with a stencil - it created a lovely blob. I suspect better results might be achieved if the fabric was dampened slightly to allow the stencil to 'grip' the cloth a bit better. The bottom right was a very light application of the mist on stamp - and you can see that not much happened....
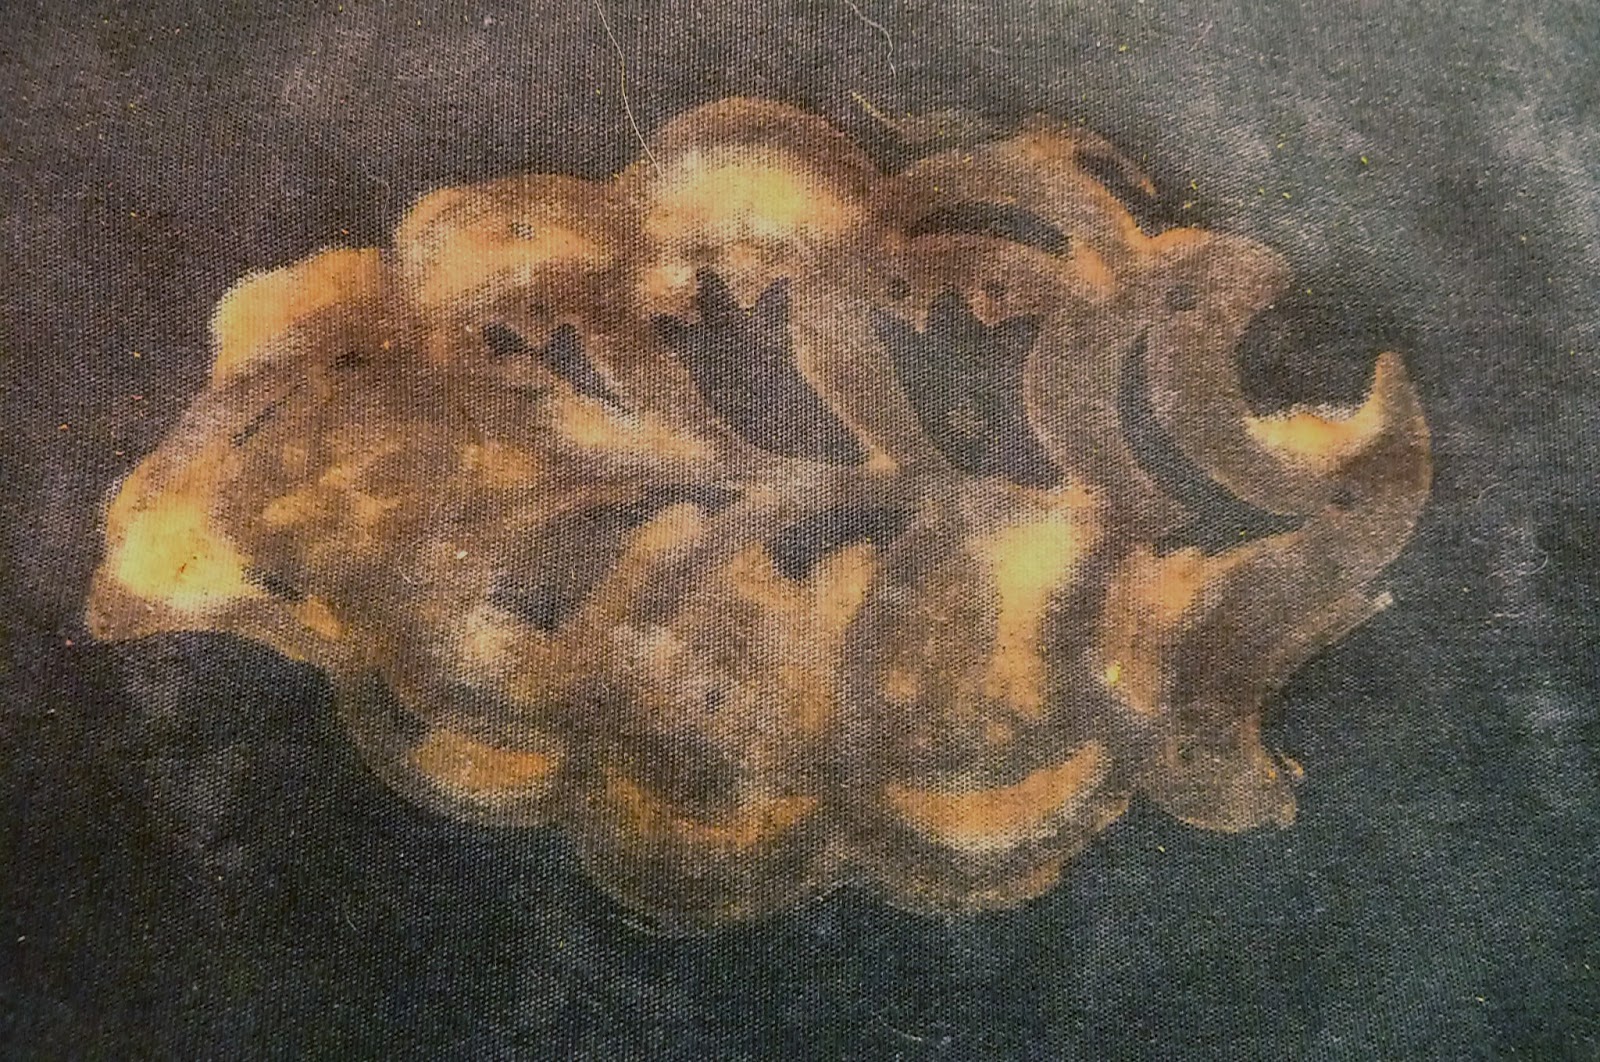
 A close up of the sunflower stencil applied with paste using a stencil.
 Close up of the stencil on linen - not quite as crisp detail - let alone the singed fabric! 
I used an old iron on the linen setting but that I had forgotten 
that this particular iron had the nasty habit of getting very hot!
The foam stamp used with the paste on linen... still not as crisp as on cotton. It could well have been operator error though. I think there is a bit of a learning curve with this. As with any paint on a stamp one needs to learn the best combination of product, pressure and fabric.
To my nose this product smells rather ammonia-y with a hint of citrus. It is not as nasty as bleach but it IS something that I think you should use either outdoors or with very good ventilation. As you might expect when the dry cloth is ironed it creates a cloud - and that, most decidedly, needs a good breeze to blow the residue out of the air.  I have asthma and I didn't go into a paroxysm of coughing or need a rescue inhaler when I used this indoors - but I DID have a fan on high with a back door open to provide some ventilation when I ironed. I think it pays to be cautious. I do believe that this wouldn't be as harmful to fabrics as bleach - even with bleach neutralizer. I believe it has been proven that bleach discharged cloth will continue to degrade at a higher rate over time than untreated cloth will. In that respect alone I think this is an excellent alternative to bleach discharging.

Below: 
using the spray DeColourant on the black Moda Marble. The discharge is comparable to bleach I think...along with the interesting color changes that can occur. Yes, I think this is a great application for creating sky textures.
Below: 
Now, this is the very cool DeColourant Plus in action. I used foam stamps. The top photo is Lemon Yellow on Moda and the bottom is the Neon Orange.I do enjoy the way the product both removes and adds color in one fell swoop. It works quite well - and is a very interesting concept.
Below:
This photo of the Neon Orange is a bit washed out. What can I say. It's POURING rain and really dark and dank out doors- but it worked okay with my happy light for lighting!
Below:
Ah! Here's the results on paper. The black bit of paper on the left was discharged with bleach. The dark green paper on the right was discharged with the paste DeColourant and the sunflower stencil. Excellent results!
I think this is a good product and an excellent alternative to discharging with bleach. I think that adequate ventilation is a necessity. I like using the paste very much - it does indeed allow for fine detail and is easy to apply with a brush. I love the concept of being able to both remove color - and replace it - in one application. What a cool idea. All in all I think this product provides a lot of very interesting possibilities and is well trying. It works like a charm on paper - and should have wide appeal not only to textile artist but also to mixed media artists and journal-ers. It is available in mist, paste, many colors, and very handy sets of colors that are available as pastes or mists!.Thanks Kandi Corp for developing this excellent new alternative to using caustic bleach!


note:
This product was provided to me by the manufacturer for the purpose of an honest review. No other remuneration was provided.

Monday, May 24, 2010

"Fabric Dyers Handbook" by Linda Johansen


This is a cross post from my Book Blog because I thought it would be of interest to all of you fabric artists who enjoy dyeing your own fabrics.

This is a new book that arrived today from C&T Publishing. Despite the fact that the author, Linda Johansen, and I share a last name - I don't know her. Ratz!  This is a book that I really, really like. It is clearly and concisely written and is exceptionally well illustrated. The book is well laid out.

The basic are, of course, covered in the beginning of the book with detailed instructions for handling and mixing dyes- and the importance of record keeping- something that I was never very good at doing. I just always loved the kismet of the process - I liked never knowing what would happen. Linda compares clear, muted and black colors offered by both ProChem and Dharma Trading.
Instructions and measurements are provided for dyeing fat quarters, half yards and yards of fabric - cutting down on some of the guess work and, I think, causing less waste of materials in the long run. Rainbows are a favorite for us all and Ms. Johansen's instructions are easy to follow to create a rainbow in clear, muted or dark colors.

Linda Johansen has had 5 books, I think it is, published through C&T Publishing. I am so pleased to have this as an addition to my dyeing library. I think it's a book that will please anyone who has an interest in hand dyeing their own fabrics. Available from Amazon, Barnes & Noble, your wonderful local book store or directly through C&T Publishing.
The back of the book includes some speciality  techniques such as: 
tie dyeing, rolling, patterning, pleating and dipping.

Tuesday, November 18, 2008

Results From The Dye Painting Class

It's amazing how this simple combination of color just makes me sigh -
like being outdoors on a sunny day!


As you can see from these photos. I had a wonderful, fun play time in Ann Johnston's Dye Painting class . I had somewhat forgotten what a "high" it can be to do this sort of work. Now, at least, I know that I will be doing more of it! I have 4 pieces that I will be working on some more today and I also have 5 pairs of socks curing in colors that I could not find and needed: warm brown, moss green,gray,deep red & one that will be a surprise. I can't wait to share the other pieces - of course they may look great or they may look bad -- that's what I love about this technique. You can make add as much serendipity as you wish to the process! I wish I had taken more photos of people's work - but the lighting really left a lot to be desired. Hopefully, Robin will post some photos of her work on her blog. Her fabrics were magical - even as a "dye virgin" as she called herself!

In other news, I need some feedback from those of you who have been stopping by for awhile. I am considering, for a variety of reasons, switching to TypePad for my blog. I am wondering if making the change would bother you - or would you follow the blog in the new location? I have twelve more days to decide - so I would appreciate comments and feed back about this. Thanks!!!! in advance!
Violet and gold -
One of my favorite color combinations !

A touch of lime green & yellow with some red & black.
I like this funky little piece!
Another limey green and dark violet combination.
I was experimenting with shadow shapes
Two new pairs of socks that are richer in color than this shows.
They were thrown into whatever colors I had left at the end of the day
This is one of my favorite pieces - crazy wild I think!
Navy blue, red and green. Not sure what I think of this...but there it is!
Some good old low water immersion (LWI) dyeing. Love this piece!
The combination of violet & golds or rusts seems to be a
thread that ran through my work during this workshop.
This is my "end of day" cloth. I sopped up the left over colors with this "rag".
The 'rags' are always quite interesting! Sometimes all muddy - sometimes usable!

Monday, August 25, 2008

IDye From Jacquard

Not long ago I ordered a few colors worth of Jacquard's new IDye. I had nothing in mind to use it for but thought it was an interesting concept & I wondered if it might be a mini alternative to hauling out all of the supplies needed for normal Procion dyeing. Yesterday, in the midst of making a cake I had a color fit! I wanted to play with some color. Ta Da !! I though I might sprint between two rooms and try some of the little dye packets that were languishing on the shelf. IDye is comes in small packets that are dissolvable (ask me how I know this!). I put about 1/3 of the packet into a bowl....actually into two bowls since I decided to try two colors : chartreuse & lilac. This dye is most definitely made to vat dye in the washing machine. I have used Rit dye in the past to spot dye things and to quickly make a pair of dyed socks or something - and it always worked well. I would rate the IDye in much the same the same way that I rate Rit Dye.

Below you will see two pairs of socks. One dyed in Chartreuse & one pair that I tried to paint with Chartreuse & Lilac and then, not liking the results, I over-dyed with the rest of the Lilac. I "cooked" these in a glass container in the microwave for 6 minutes on high heat. I think that I am going to order some more of this product- it will be great for freshening up some black shirts & slacks, though I think Rit might work as well. I wish there was an indication about the ingredients on the IDye packet - my initial feeling is that this dye cannot be kept for too long in a liquid state - unlike dye concentrates that you would make for dye painting. I want to experiment some more with IDye. All in all at this point I think that straight Procion dyes work best if you are doing anything other than all over color. That being said, I think I can see some other possibilities for IDye - I just need more time& product to play with. I am wearing my Chartreuse socks today and, I have to say, they rock!

Monday, November 12, 2007

Black Walnut Dye

I began today's adventure with my dyepot. I used a modest amount of the black walnuts since I had not odea of how many/much I would need. I have a good amount left so no worries about wasting them. I may never understand the wonderful world of uploaded Blogger photos. Although the browns are not really deep -towards black- they most definitely ARE much more saturated then these photos indicate. The resulting browns are more like the pot they were dyed in ! It was a very gray day here too - and so I expect that the camera used it's built in gray card to make it all look more gray then brown....oh well. There will be more photos and more experiments!

I decided to keep it very simple and used what I had at hand. Plain, unbleached, non-PFD, muslin. I also decided to try the first batch with no mordants. The walnuts (hulls and nuts) simmered for about 1/2 hour & then I added my first piece of dry muslin - see the middle photo below. Then I tried both less and more time in the dyepot. These photos look gray - but they are brown really. The results are a really nice suede brown (taupe kind of) color. I think that I could have really gotten a good saturated brown had I used more nuts which would have resulted in a stronger dye bath.
Of course I had to try some tie dye - now I remember how fun that is to do !
Below are two pieces that, once again are brown, not gray. The one on top was loosely wadded up and loosely rubberbanded - but the rubberbands broke somewhere in the process. The one on the bottom was folded and wrapped more tightly. I really like this piece and wish I had used a larger piece of fabric.


The piece below made by spreading wet fabric across a piece of "water" glass that I had spread with discharge paste & brayered. The fabric on the right had full strength discharge paste and the fabric on the left was made with diluted paste & it also lay on the glass a shorter amount of time.
So now my questions are:
1. How would PFD fabric affect the dye?
2. How many more walnuts would make a stronger dye bath?
3. How much more time in a stronger dye bath would it take to make a rich almost black dye?
I am looking forward to more experiments now and will have to unearth my PFD fabric to see how it reacts with the dye. Lots of fun today !

Casino Bonus